This is a summary of a lecture provided by Anthony I. Riccio, M.D., and Kelsey Thompson, C.P.O., L.P.O., as part of the series Coffee, Kids and Orthopedics for medical professionals.
You can watch the full lecture and print the pdf.Pediatric Foot Exam
Assessment of Rotational Deformity
Foot Progression Angle
The initial phase of the foot exam is to get an understanding of the child’s foot progression angle. Foot progression angle refers to how the foot lies in relationship to a line projected directly in front of the foot. The angle can be affected by the structures in the foot itself and/or by rotational differences in the hip, the leg or within the foot. The angle can also be affected by how the foot strikes the ground during walking.
Gait Assessment of Foot Progression Angle
Imagine a line projected directly in front of the patient.
- Neutral: Patient’s feet are parallel to that line as they take steps.
- External: Patient’s feet are turned externally or away from that line.
- Sometimes referred to as a “duck walk” by parents.
- Internal: Patient’s toes are turned towards this line.
- Sometimes referred to as “pigeon-toeing.”
Though the foot progression angle might be perceived as abnormal by the parent, it is more important to look for a pathologic situation that might be responsible for it. If a patient has a foot progression angle that doesn’t seem normal, you want to see if that deviation is coming from an extremity more proximal to the foot.
Supine and Prone Assessment of Femoral Version
We typically start by assessing rotational profiles of the hip to see if there is any excessive internal or external rotation deformity that might be contributing to the way the foot rests against the ground as the child takes a step.
Supine Assessment
- Flex the hip and knee to 90° maintaining neutral rotation.
- Internally rotate the hip (which will externally rotate the leg in relation to the thigh).
- Estimate the angle of internal rotation.
- Externally rotate the hip (which brings the leg inward relative to the thigh).
- Estimate the angle of external rotation.
- Compare to contralateral.
Prone Assessment
- With hips extended, flex knees to 90°.
- Assess internal and external rotation of the hips.
- Estimate the angle between the leg and the table.
Assessment of Tibial Torsion
Tibial torsion, or rotation, may contribute to an abnormal foot progression angle.
Prone Assessment
- Flex the knee to 90°.
- Visualize or draw a line directly down the axis of the patient’s foot.
- Visualize or draw a line directly down the axis of the patient’s thigh.
- Assess the angle between those two lines.
- If they are perfectly colinear, the angle is 0°.
Supine Assessment
- With hip and knee extended, rotate the hip until the kneecap points straight up in the air.
- This takes removes rotational differences in the hips to assess rotation in the lower leg.
- Estimate the angle of the feet in relation to the plane of the table.
Assessment of Metatarsus Adductus
Sometimes a foot deformity is causing the patient’s internal foot progression angle. The most common is metatarsus adductus, in which there is an internal rotation of the foot itself. These feet are normal structurally on the inside, but they were molded into somewhat of an internally angulated position during intrauterine gestation.
Prone Assessment
- Draw or visualize a line straight up the axis of the heel.
- Project that line distally to get an understanding of where the second toe lies in relationship to that line with the ankle in a neutral position.
- As the foot turns more inward, this line will then intercept the third toe, the fourth toe, the fifth toe or no toes at all.
Examination of the Foot
Assessment of Standing Alignment of the Midfoot and Hindfoot
Standing Assessment – Anterior View
- Assess the position of the foot in relationship to the tibia and the hips.
- Assess what the midfoot and forefoot are doing in relationship to the hindfoot.
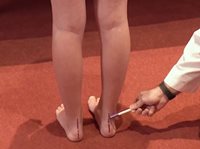
Standing Assessment – Posterior View
- Assess the position of the calcaneus or heel bone in relationship to the Achilles.
- Draw or visualize a line directly down the Achilles tendon.
- Draw or visualize a line directly down the axis of the posterior tuberosity of the calcaneus.
- Assess those lines to see if they are relatively collinear.
- In a severe planovalgus or flatfoot deformity, the heel axis would be positioned very far externally, in relationship to the Achilles.
-
- In a cavovarus foot deformity, say in the setting of Charcot-Marie-Tooth disease, that calcaneal axis would be turned inward significantly in relationship to the axis of the Achilles.
To get a sense of how turned out the midfoot is in relationship to the hindfoot, assess how many of the patient’s lateral digits you can see lateral to the heel bone:
Standing Assessment – Posterior View
- It is normal to see the 5th toe and part of the 4th toe on both sides.
- Seeing the third toe and the 4th toe means the midfoot rotated out.
- This is typically seen with a flatfoot deformity.
- If you can’t see the small toe, the midfoot is rotated inward.
- This is seen with metatarsus adductus or in cavovarus deformities seen in children with peripheral neuropothies.
Assessment of Subtalar Motion
Toe Rise Test
The subtalar joint includes the talus, also called the “ankle bone,” and the calcaneus. This is where the heel either turns outward in a valgus deformity, like a flatfoot, or inward such as in a cavovarus deformity associated with peripheral neuropathy.
Visualizing the foot from behind helps you assess flexibility, especially in the presence of a flatfoot deformity. You can get a sense of subtalar motion by whether or not the angle between the axis of the posterior tuberosity of the calcaneus and the Achilles changes as the child goes from a standing flat position to standing up on their toes.
Standing Assessment – Toe Rise Test
- Visualize the axis between the Achilles and the posterior tuberosity of the calcaneus is in standing.
- Observe the axis as the patient elevates “way up” on their toes.
- If the heels turn inward in relation to the Achilles into a varus position, it indicates flexibility in the subtalar joint. This joint is called the subtalar joint, and it is the joint through which the heel either turns outward in a valgus deformity, like a flatfoot, or inward such as in a cavovarus deformity associated with peripheral neuropathy.
Coleman Block Test
A classic test used to assess subtalar motion, which is really for children with a cavovarus foot deformity is the Coleman Block Test. This test is designed to assess flexibility through the subtalar joint in a patient who has their heel turned inward and helps discern whether or not that turning in is due to inflexibly in a fixed deformity through the subtalar joint, or if it is simply a result of the first ray striking the ground before the 5th ray, and forcing the heel to angulate inward as a result of a very high arched foot.
Standing Assessment – Coleman Block Test
- Assess the angle between the Achilles tendon and the posterior tuberosity of the calcaneus.
- Have the child to lift their foot up.
- Place a small block just under the lateral aspect of the forefoot.
- Ask the patient to put all their weight down on the foot.
- This drops their big toe so you see what happens to their hindfoot.
- If the heel does not turn into a more valgus position, it indicates a rigid subtalar joint which could be a varus deformity.
- This drops their big toe so you see what happens to their hindfoot.
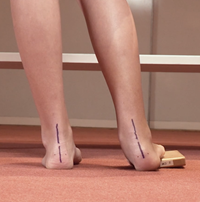
Table-Top Testing of Ankle and Subtalar Motion
The ankle joint, made up of the talus, tibia and fibula bones, is designed to flex and extend only. Side-to-side motion comes from the subtalar joint. An inability to move the subtalar joint might be indicative of an abnormal bony connection either between the heel bone and the ankle bone or between the heel bone and the navicular bone, which are termed tarsal coalitions. These are typically seen in a rigid flat foot deformity.
Seated Assessment
- Bring the ankle joint up into maximal dorsiflexion.
- It also allows you to isolate the subtalar joint.
- This locks the widest part of the ankle joint into the ankle mortis to prevent any inadvertent motion though the ankle joint.
- Grab the heel on either side both medially and laterally.
- Move it inward (supinate) and outward (pronate).
- If the foot will turn in and turn out, it indicates excellent motion through that joint.
Vascular Assessment
- Assess the tibial artery pulse which lies directly posterior to the medial malleolus.
- Assess the dorsalis pedis pulse just a few centimeters proximal to the first dorsal web space.
Plantar Skin Assessment
- Calluses on the outside of the foot are frequently indicative of lateral column overload.
- This is seen in children with residual clubfoot deformities, or in cavovarus foot deformities.
- Calluses on the medial border of the foot are seen in children with flatfoot deformities.
The Silverskiold Test for Achilles Contracture / Gastrocnemius Tightness
One of the most important parts of a foot and ankle exam is understanding tightness of the Achilles tendon, the gastrocnemius muscle or the gastric-soleus complex. The Achilles tendon is derived from two muscle groups: the gastroc muscles and the deeper soleus muscle. Children with flat foot deformities or who walk on their toes often have tightness in one or both of those two muscle groups. To differentiate between tightness in the gastrocnemius or tightness in both the gastrocnemius and the soleus, we perform what is called the Silverskiold test which assesses passive dorsiflexion of the ankle with the heel held in an internally rotated position.
Supine Assessment – The Silverskiold Test
- Bring the Achilles out to maximal length by turning the heel in.
- Grab the heel while supporting the rest of the foot with your wrist and the lower part of your forearm.
- Keep the knee extended to keep the gastrocnemius muscle as tensioned as possible at the knee.
- Assess passive ankle dorsiflexion.
- Document the difference between neutral dorsiflexion, which is 90°, to the leg to get your baseline assessment.
- Then bend the knee to relax the gastroc muscles.
- See how much more you can dorsiflex the foot.
- The gastroc muscles are usually much tighter than the soleus.
- If there was no difference, in the amount of passive dorsiflexion with her knee extended and the gastrocs on stretch and then the flexed, then the tightness would be a result of combined issues with both the gastroc and the soleus complex.
- The gastroc muscles are usually much tighter than the soleus.
This not only helps in surgical decision making, but it can help clinically with regards to deciding how we are going to stretch out children with tight heel cords.
Assessment of Ankle Instability (The Anterior Drawer Test)
Ankle instability is common in relatively older kids, especially those who have had multiple ankle sprains. In order to test for ankle instability, we first have to understand the ligamentous anatomy on the lateral side of the ankle. Those two ligaments are both attached to the lateral malleolus, or the fibular bone.
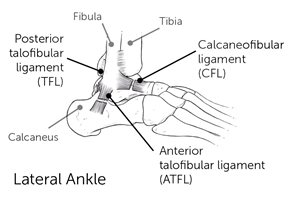
- The anterior talofibular ligament (ATFL) is the more anterior of the two and connects the fibula to the talus (ankle bone).
- The calcaneofibular ligament (CFL) is the more posterior of those two and connects the fibula to the heel bone.
To test for stability, individually assess the function of each of these ligaments with an anterior drawer test.
Seated Assessment – Anterior Drawer Test in dorsiflexion and plantarflexion
Dorsiflexion places the CFL on maximum stretch and plantarflexion places the ATFL on maximum stretch.
- Cup the heel.
- Grab the ankle bone with your thumb while supporting the tibia.
- Bring the ankle into dorsiflexion. *
- Pull forward on the foot and the heel bone while pushing back on the tibia or leg bone.
- See if there is excessive anterior translation through the ankle joint.
* Repeat the test but with the ankle in maximum plantarflexion.
Children without connective tissue disorders will only have ankle instability on one side, typically due to multiple injuries and sprains. Always compare the amount of translation from the bothersome ankle to the normal ankle to assess for any difference.
Assessment of Anterior and Posterior Ankle Impingement
An anterior ankle impingement is typically the result of a dysmorphology of the ankle joint, typically the talus. We see this frequently in children who have had prior interarticular surgeries, particularly those with clubfeet. Their ankle, which is supposed to be a relatively rounded joint becomes more flattened and can’t roll under the tibia bone. Instead it’s flat and as they try to advance the tibia over their foot in walking, the front of the ankle bone bumps and bangs into the front of the tibia bone.
Seated Assessment – Anterior Ankle Impingement
- Palpate for tenderness around the anterior aspect of the ankle.
- Perform forceful maximal dorsiflexion to see if that forceful abutment of the talus into the tibia reproduces anterior ankle pain.
With posterior ankle impingement, some children will have an os trigonum which is normal ossification (bone growth) behind the talus bone. The vast majority of these are completely asymptomatic, but occasionally it can be large enough or the child can be active enough that the ossicle will bang against the back of the ankle during points of maximal plantarflexion. This is commonly seen in gymnastics and dancers who spend a lot of time up on their toes. Because they are repeatedly, maximally plantarflexing their ankle, they can force the ossicle into the posterior aspect of the joint which can create pain.
Seated Assessment – Posterior Ankle Impingement
- Palpate for tenderness around the posterior aspect of the ankle.
- Forcefully plantarflex the ankle to see if we can reproduce posterior ankle pain.
Assessment for Overuse Conditions
Sever’s Disease
Calcaneal apophysitis, or Sever’s disease, is a type of overuse injury caused by repetitive movements. It is the most common cause of heel pain in active children ages 8-12. This is often seen with tightness in the gastrocnemius, and the growth plate, the calcaneal apophysis becomes inflamed.
Seated Assessment – Palpation of the Calcaneal Apophysis
- Examine the insertion of the Achilles tendon in the area of the calcaneal tuberosity.
- Slide your thumb off the very back of the heel.
- Approximately 1 – 1.5 centimeters forward.
- Push and squeeze on both the inside and outside of the calcaneal tuberosity, this will reproduce the pain in children with Sever’s disease.
Plantar Fasciitis
More often seen in adults, children and adolescents may also experience this tightness and pain on the plantar aspect of the foot. Oftentimes it doesn’t stop a child from doing the activities they want to do, but it becomes bothersome after they’ve stopped their activities and sit down or are taking a car ride or get out of bed first thing in the morning.
Perform a Silverskiold test to assess plantar fasciitis because it is directly linked to tightness of the gastroc soleus complex.
- Take the big toe and dorsiflex it as much as possible.
- This puts the plantar fascia on stretch because of some attachments to the flexor of the big toe.
Often passively dorsiflexing or extending that big toe will be enough to set these children off if they have a fasciitis in this area. If not, it certainly allows us to really get a sense of how tight that plantar fascia is and directly palpate it to see if it is painful for the child.
Kids and Insoles: An Introduction to Orthotics
Kelsey Thompson C.P.O., L.P.O.
Orthotist Perspective
What should you look at first?
- Look at what shoes the patient presents with.Are they supportive shoes or flexible/non-supportive shoes?
- Ask if those are the most commonly worn shoes, or if they have others.
- Ask when the patient has pain.
- With shoes, barefoot, all the time?
- Do any shoes make their pain improve?
- Have they tried better shoes or any off the shelf insoles?
- If so, what have they tried?
Shopping for Shoes
Proper sizing is important.
- The quality of shoes is better in adult sizes versus kids’ sizes.
- Kids shoes are sized off Men’s sizes.
- 5Y is a 6.5 Women’s, so girls can get into women’s shoes quicker than boys.
- Women’s – B width, Men’s – D width.
Price
- Price can be directly related to quality but not when it comes to popularity.
- Related to quality of cushioning and how long shoe will last, not support.
- Number of miles and still have the same amount of cushioning.
Where to Shop
- Specialty running shoe stores (Run On, Frisco Running club, etc.) are recommended.
- Can get past year models online for less.
Adding Support
- Arch support needs to come from an insole bought separately.
- A severe pronator needs motion control or stability shoeDenser midsole material on medial side of shoe.
- Offered by Asics, Brooks and New Balance Shoes.
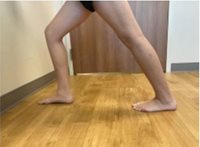
Physical Examination and Assessment
- Ask the patient to walk barefooted.
- Look for midfoot collapse, pronation, supination or rotation.
- Check ankle ROM in subtalar neutral vs maximum.
- Most of the time their calves are tight especially when in subtalar neutral.
- Ask if they were given a home exercise program (HEP). If so, reinforce the instructions that they should follow.
- Encourage them to stretch.
Determine Correctable or Rigid Deformity
Correctable Deformity
- A correctible deformity can be treated with off-the-shelf insoles.
- These are made off a generic model.
- You want to look for one with actual support not one that is just a cushion.
- You will need to purchase one size up and trim to fit the entire arch.
- Recommended brands:
- Superfeet, Spenco, New Balance, KidSole.
- Recommended stores:
- Run On, Dick’s Sporting Goods, Academy Sports + Outdoors, REI.
Sometimes customized off-the-shelf insoles are needed. These are made off a generic model but they are made with materials that can be modified This gives us the ability to adjust as necessary.
Off-the-shelf inserts are great for someone with a flexible flat foot. This means their foot can be fully corrected to have a good arch, but their arch collapses when bearing weight. The insole will support their arch.
Rigid Deformity
A rigid deformity will require custom foot orthoses.
- Made from a foam impression or cast.
- Takes 2-3 weeks for fabrication.
- Requires a little more room in shoe than off-the-shelf.
- A variety of materials available to fit patient’s needs.
- Foams and plastics.
- Cast and Impressions.
Custom orthotics are for patients with a fixed foot position where the arch is fully collapsed to the point that their navicular is almost dropped to the ground and they cannot be corrected.
About the Speakers
Anthony I. Riccio, M.D., is a pediatric orthopedic surgeon and the director of the Center for Excellence in Foot at Scottish Rite for Children. He specializes in clubfoot & other foot disorders and limb lengthening & reconstruction. He sees patients at our Dallas campus.
Kelsey Thompson C.P.O., L.P.O., is a certified prosthetist orthotist at the Scottish Rite for Children Orthopedic and Sports Medicine Center in Frisco. She studied biomechanical engineering at Texas A&M and trained in prosthetics and orthotics at UT Southwestern in Dallas where she also completed a residency in prosthetics and orthotics.